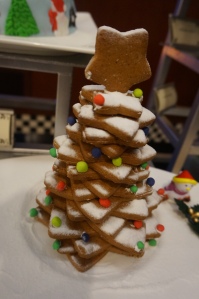
DIY clay ornaments
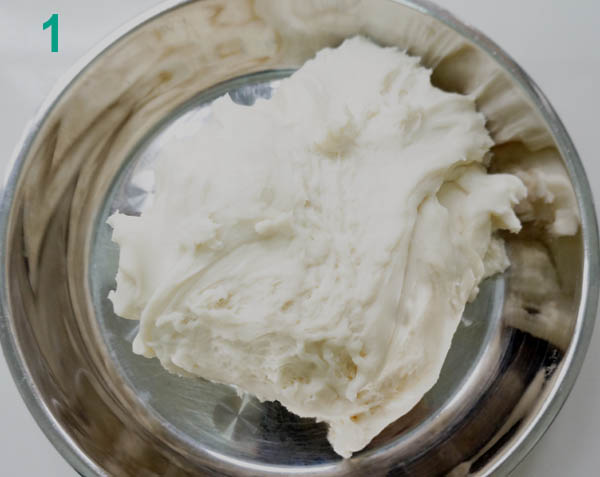
November 28, 2014 at 9:06 am | Posted in christmas, DIY gift, Preschool plays, Uncatogorized, xuen and Lyn | Leave a commentWe loved the idea of DIY Christmas ornaments. I found a few recipe online and I tried working with the recipe that contained glue. It was not turned out well (blame my skill). I then found an easier one provided by an awesome blogger at http://theimaginationtree.com/2012/12/white-clay-ornaments-tutorial.html. I followed exactly her tutorial and we are happy with the result. It is so easy to make. The clay dough was soft and easy to knead. My girls had so much much playing with it and we ended up making clay dolls instead of Christmas ornaments. We will make the next round for the ornaments.

Kids cooking is always the best and fun play for kids.

We used cookie cutter to cut out the shapes. The pink dough was added food coloring.


After baking the clay. We decorated it with colorful florecent gel pens.
Have a Lovely DIY day!
Edible water beads
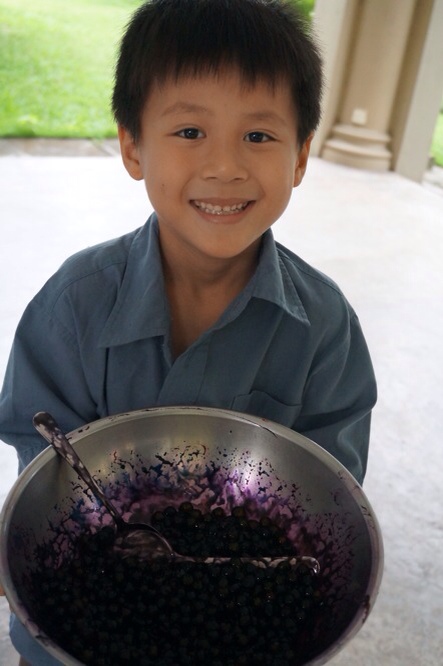
November 13, 2014 at 8:17 am | Posted in Homeschool, Kids activities, Preschool plays, Uncatogorized, xuen and Lyn | Leave a commentToday's weather was windy and partly cloudy, it is just a wonderful day for children to carry out a fun outdoor activity. My girls have cousin E to join the fun play today. They wanted to have a mini camping and fun games. The three cheeky pies wanted to play with mix water beads with colors. They seen this activity from Pinterest a few days ago. Go ahead kids!
We had a great fun and messy play outdoor.

We used big pearl sago. Cooked it for abot 30 minutes or until it swell up. Leave it cool down or rinse it with cold water so that children can place their hands in to play it.
Sago is a starch taken from the center of sago palm stems. Sago has similarities to tapioca, including its look, taste and feel. However, sago is not tapioca, which comes from a different plant. You can, however, substitute tapioca for sago in many recipes.


The kids mixed sago beads with food coloring.


Time to get mess!

Mess is Fun,
.”….so, what are we going to do with these beads?”
“Kids, you got to help to clean up the mess. Tell me what can you do with it?”


” We had a great idea! Lets add it into the compost.”
Wishing you have a lovely DIY day!
DIY ruffles flower necklace
September 24, 2014 at 3:44 am | Posted in DIY gift, fabric crafts, Girl's accessories, Necklace, Uncatogorized, Upcycled projects | Leave a comment This beautiful ruffle flowers were taken out from an old T-shirt. I am going to turn it into a pretty necklace.
 I added tiny blue rose buds along the ruffle flowers. Then hot glue the thin pastel green ribbon at both end of the ruffle flowers. Now the old ruffle flowers had changed into a totally new look. Isn’t it beautiful?
Tip : You can get the similar ruffle flower from sewing craft shop.

My little Sweet Pea and the ruffle necklace. I think she looks pretty with the necklace :).
Have a Lovely DIY day!
Bake egg and cheese rice in remekin
September 23, 2014 at 10:08 am | Posted in Asian foods, food, food art, Foods, Kids activities, Kids cooking, Kids foods | Leave a comment Cut potato into thin strips.
 Brown potato strips in a frying pan.

 Put in the browned potatoes strips, egg, cheddar cheese, and rice into the ramekin. Here I made (A) with rice and (B) without rice.
Then bake them into the oven at 150C for 10 minutes.
 I often bake cheese rice in single ramekin for my girls for snack. To keep warm, I covered the ramekin with aluminum foil then place it into a Thermo box and into a warmer snack bag. 🙂
Have a Lovely DIY Day 🙂
Bear bun in the cups
August 25, 2014 at 10:28 am | Posted in food, food art, Foods | Leave a commentMy girls love those pretty baking cups. They enjoy eating snack in the cup such as cereal, nuts and bread sticks. Instead of the sweet colorful and creamy cupcakes, I made cute bun in the cup. They are as pretty and yummy as cupcake except less sugar.
Bear bun in cups tutorial


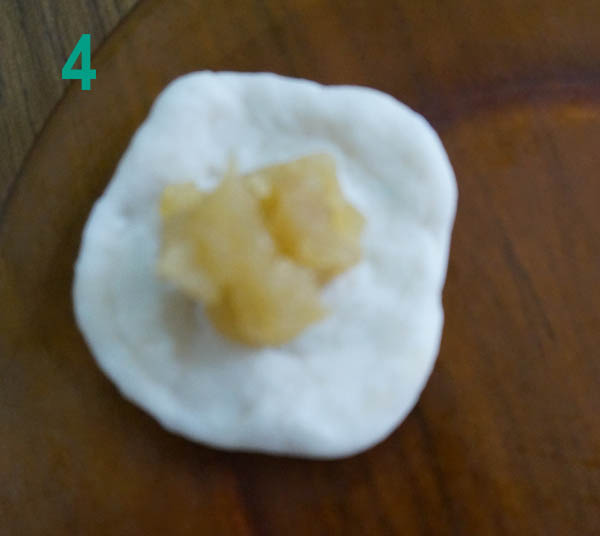
2. Make the dough flat and place the filling on it. I used lotus paste for making this bun. You can make it plain.

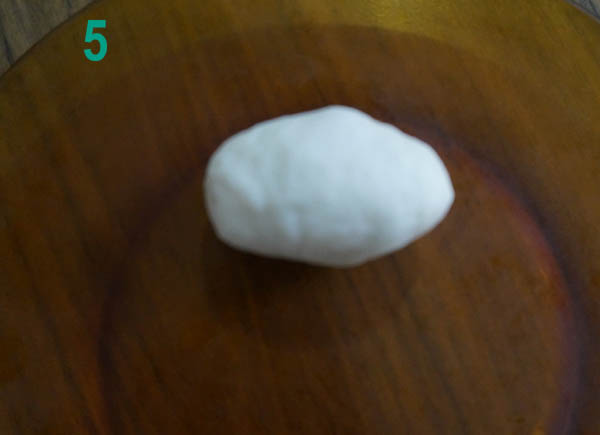
3. Close the dough with filling inside and make it into a ball.

4. Place the ball into the baking paper cup. Then make their ears with two small balls with the dough.

My lovely cutie bear? Aren’t they adorable?
Fry wonton
August 21, 2014 at 9:12 am | Posted in food, food art, Foods, Kids foods, Uncatogorized | Leave a commentWonton is a type of dumpling which commonly found in Chinese cuisines. Wonton skin is made by spreading a square wrapper (a dough skin made of flour, egg, water, and salt).
I often wrap wonton with the leftover meats and vegetables. What I did was I blend the foods with blender to make them fine so it will be easy to wrap. By doing so, there will be no wastage of foods because my family love to eat wonton either cook it with soup or fry them. Besides, it makes a good snack for kids.
I would like to share with you the basic way of wrap wonton. This is how I did:

Place the wonton sheet this way. Put the fill at the center of the sheet.
Fold the wonton sheet as shown above.
 Join point A to B

It will look like this.


My snack! I love to eat it with avocado 🙂
Have a Lovely DIY day!
Cute mini bunny bao / steam bun
August 12, 2014 at 4:26 am | Posted in Asian foods, food, food art, Foods, Homeschool, Kids activities, Kids cooking, Kids foods, Party foods, Preschool plays | Leave a commentLittle sweet pea loves mini bunny bao (steam bun). This morning little sweet pea and I had fun playing with the boa dough and our mini bunny bao turned out lovely and yummy.


 Aw…aren’t them cute?
Here is the recipe that I use with Thermomix machine. This recipe was taken from ‘easily cook for you own.blogspot.com’, I have a problem of linking it here.
Ingredients:
130 g water
1 tsp yeast
15 g sugar
15 g oil
250 top flour*
Pinch of Salt
*Not high protein / multi-purpose flour
Method:
| Cover | Time | Temp (°C) | Speed | |
| 1) Add water, yeast, sugar and oil into TM bowl | Yes | 40sec | 37 | 3 |
| 2) Add flour and salt to mix | Yes | 20sec | – | 3-6 |
| 3) Knead the mixture | Yes | 2min | – | Knead function |
| 4) Roll, cut and shape into pieces, place them on oiled Varoma dish and tray. Leave it to rise for 30 mins | – | – | – | – |
| 5) Add 500g water to boil | Yes | 15mins | V | 3 |
| 6) When temperature reached V, remove measuring cup and put on Varoma dish to steam | Varoma dish with mantou | Balance of at least 10 mins | V | 3 |
If you do not use Thermomix. Please follow this recipe that I taken from China Sichuan Food.com.
Ingredients
- 300g all-purpose flour
- 2 and 1/2 teaspoon instant yeast (one packet instant yeast)
- 2 tablespoons sugar
- 150g water or milk
Instructions
- Prepare warm water around 35 °C and melt the sugar in. And mix the yeast with the water. Mix well and set aside for around 5 minutes. If you do not want sugar, just skip it.
- Prepare the flour in a large bowl. Pour the water with yeast slowly to the bowl with flour and stir with a chop sticker.
- Then knead the flour into smooth and soft dough. At the very beginning, it might be a little bit sticky.
- Cover the bowl and let the dough rest for around 1 hour or until the paste ball doubles in size. This process can be done by mixer.
- When the dough is double in size, get paste ball out and punch the air out.
- Then roll the dough into a long log around 1 inch in diameter or any size you want.
- Scatter some flour on your board and cut the log to small sections you like. Brush some oil on the bottom of each bun.
- Add cool water in wok and put the buns in the steamer to steam. Continue to steam for around 15 minutes after the water boils.
Read more at http://www.chinasichuanfood.com/chinese-steamed-buns/
Have a Lovely DIY day!
Cute Miffi burger
July 25, 2014 at 8:40 am | Posted in food, food art, Foods, Kids activities, Kids cooking, Kids foods, Party foods | Leave a comment Two slices of bread and one fried egg
 Spread homemade dragon fruit and pineapple jam on the bread. Then top it with fried egg and cheese.
 Put two slices of bread together. Use a glass to place it at the center to cut the bread into a round shape.
 It will look like this.

Use melted chocolate to draw a Miffi.

Since I was making this for my girl to bring to school. I kept the Miffi burger into an aluminum pocket and sealed it. It will help to keep the bread soft after few hours. Beside, it is easier for the kids to eat by holding the bread with the aluminum pocket so the filling won’t drop out.

 A simple last minute snack pack for my girl.
Wishing everyone has a lovely weekend.
Easy Hello Kitty bento
July 22, 2014 at 7:43 am | Posted in food art, Foods, Kids activities, Kids cooking, Kids foods | Leave a commentMaking bento is a fun activity for parents and kids. It allows children experience of creating meals with you can help to build their self-confidence and lay the foundation for healthy eating habits.
I am going to share with you a simple Hello Kitty bento set which I made with silicone ice mould. Using ice mould to mould the rice is the simplest way of making cute rice balls. My daughters love to create their bento with ice mould.
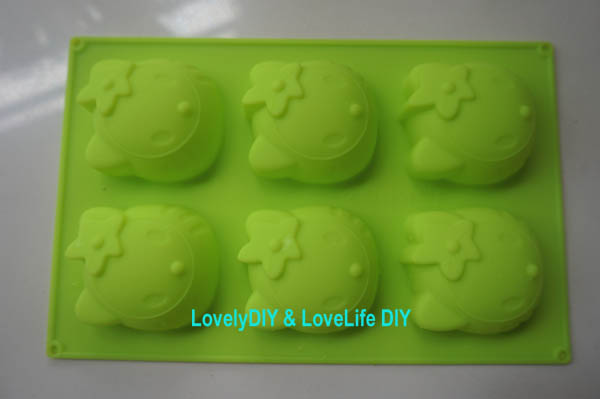 Hello Kitty silicone ice mould
 Fill plain rice into the mould.
 Ta-dah! you have got the lovely hello kitty shape rice.
 The eyes were made with seaweed. You need to have a seaweed puncher to help you to make the eyes nicely. I bought the seaweed puncher online. Daiso sells it but I personally think that the quality was not so good. It is no harm to get a cheap one to try.

Lunch for my daughters. They will be pleased to see this when they come back from school. ( Fry omelette with shrimps, spinach and wolfberry soup, braise sweet and sour pork).
Wishing everyone has a LovelyDIY day!
Bacon and egg cup
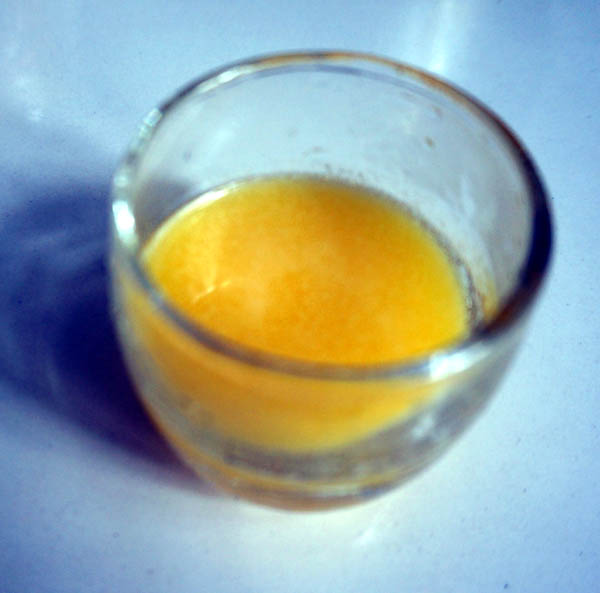
July 14, 2014 at 5:10 am | Posted in Asian foods, Foods, Kids activities, Kids cooking, Kids foods, Party foods | Leave a commentPreparing kids’s meal and lunch box in the morning is quite a challenging task for me. I only have 30 minutes to prepare the foods. I always think of quick and easy yet delicious and nutritious foods for the kids to bring to school. I would like to share with you this quick to prepare bacon and egg cup which I came across from a magazine.

Grease the muffin pan with butter then tear and lay the bread as shown.

Then cut the bread in about one inch wide stripe to cover the side of each individual cup.

Stuff cooked bacon into each cup.

Break an egg into each cup. Then bake it with uppper heat in 200 C until the egg is cook to your like. Bake longer if you prefer fully cooked egg.

 Breakfast for my family this morning.
Cute Mini burger
June 25, 2014 at 8:52 am | Posted in food, food art, Kids foods, Party foods | 2 Comments I have a habit of throwing out my ideas by doing random sketching. It helps me to get inspirations and ideas of my works. I was actually thinking of making cute mini doughnuts but at the very last minutes, I decided to try to make mini burger instead. It is easy and nice.

Use two slices of bread. Spread the one of the bread with strawberry jam. Then use any circle cutter to cut out the bread into few circles.

Decorate with colorful sprinkles. To make the sprinkles stick on the bread, I applied a thin layer of butter on top before the sprinkles.
 Lets have tea!
Have a Lovely DIY day!
Simple bread Sticks
June 3, 2014 at 1:17 pm | Posted in DIY gift, food, Homeschool, Kids activities, Kids cooking, Kids foods, Party, Party foods, Preschool plays | Leave a commentThis is a good recipe for using up the excess bread crusts. I taught my daughter to use the crusts to make simple bread sticks. Today she made this simple toasted bread sticks for her dad :). We all love it especially when we have it with hot tea.
 Left over bread crusts.
 Melt the butter
 grease the batter with butter
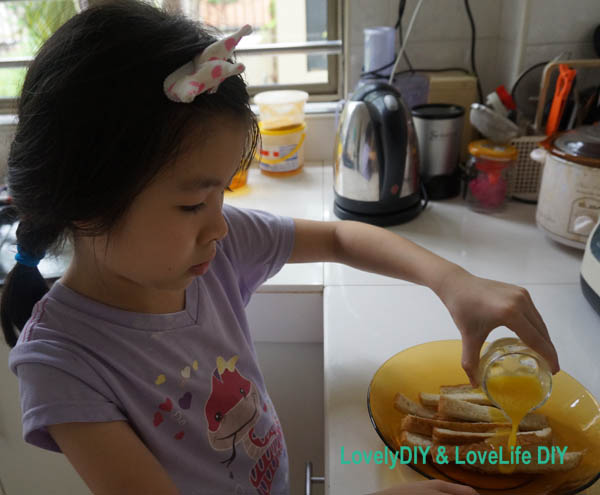 Coat the crusts with melted butter.
Pop them in to oven for 10-15 minutes at 130 C until golden brown
Remove, allow to cool.
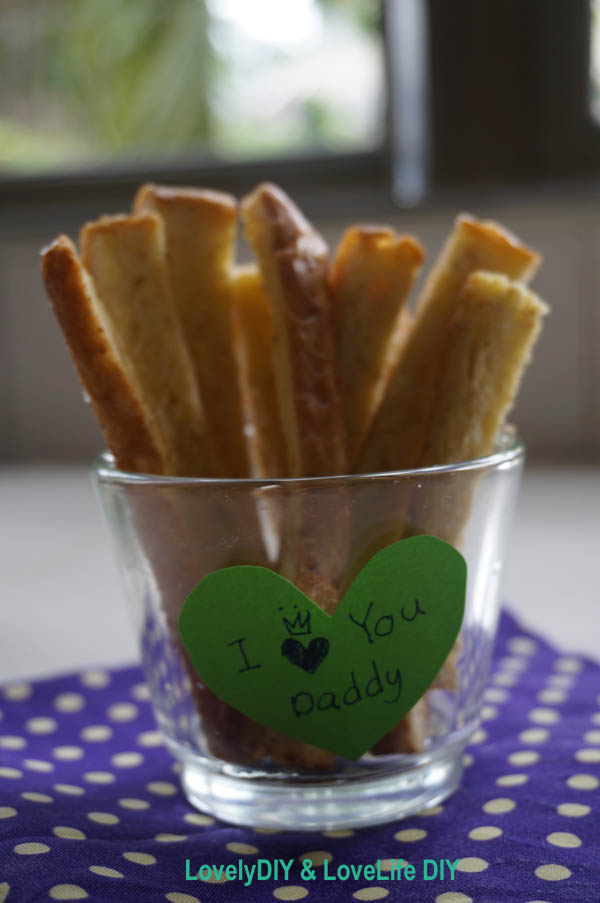
This is an awesome father’s day gift.
Have a Lovely DIY Day!
Panda rice ball
May 15, 2014 at 9:40 am | Posted in food, food art, Foods, Kids foods, Uncatogorized | Leave a comment
My three years old is literally scooting away from babyhood in search of new adventures. Haha…she loves to ‘play’ with real cooking. I think making rice ball is a fun and safe activity for her to play. Kids cooking helps motor skills development.
-First, we wrapped the rice in a piece of cling wrap, then shape it into round shape.
– Attach the ears with boiled black beans ( I cooked black bean soup today, so I made used of them to make the ears). Fix the ears to the rice with a stick of spaghetti.
– use nori seaweed to make eyes, nose and mouth by cutting them out or you can use nori cutter. (cutting part has to be done by adult).


* I used normal rice instead of Japanese rice. My rice was soft, it is easy to shape. Otherwise, you can steam the rice with egg first before you shape it. Steam egg rice created soft and stickiness of the rice. It is easy to shape.
Fun and easy, isn’t it? Now you can do it with your little one too 🙂
Have a Lovely DIY Day!
Please join us in Facebook at https://www.facebook.com/groups/LoveLifeDIY/
DIY custard pudding (with caramel)
May 14, 2014 at 10:11 am | Posted in food, food art, Kids foods, Uncatogorized | Leave a commentRecipe to make about 4 medium bowls of custard:
Recipe for caramel:
30g granulated sugar
1 tbsp water
Recipe for custard:
3 eggs
300 ml milk
50 g sugar

1. To make the caramel. Put the sugar and water in the pan and simmer until it turns browned.
 caramel


Upcycle old singlet
May 5, 2014 at 11:43 am | Posted in Felt crafts, T-shirts, Uncatogorized, Upcycled projects | Leave a commentThis is a no sew idea which I made a ruffles flower to cover the hole on an old singlet.

Firstly,fold and hot glue the ribbons or you can fold sew the ribbons. These ribbons are going to use for making ruffle flower.

Make a circular pattern on the old singlet.

Hot glue the ribbons on the circular mark. A red flower at the center of the ruffle flower. Two buttons at the side to cover the hole 🙂

Material B : pom-pom tape

Material C : handmade felt chic. I am going to put material B and C onto the singlet.

Now, it is done!
Have a LovelyDIY day.
Love bear buns
April 24, 2014 at 10:15 am | Posted in food art, Foods, Kids foods, Party foods, Uncatogorized | Leave a commentMy daughter’s school exam is just over! I am glad that I managed to spare some times for doing crafts and baking. Today, I made bear buns for the girls. They were so lovely. My buns turned up to be a little bit better than before which I over baked them and it turned out hard. I still need to try a few more times until I get the really soft buns. Any clue?

I used bread making to make bread dough. Then, shaped the bears with hands.

Freshly baked bear buns

Please meet my lovely mama bear and her baby. I used chocolate chips to make the bear’s eyes and nose. Mash mallows to make the bows and cheese for the clothes.
Recipe for bread maker machine (make about 12 small buns)
3 cups of all purpose flour
1 tbsp of yeast
1 tbsp of sugar
1/2 tsp salt
2 tbsp of vegetable oil
1 cup water
1 tbsp yogurt
Thanks for reading my post and I hope you enjoy watching.
Have a Lovely day!
heart shape pan cake
March 28, 2014 at 9:05 am | Posted in food art, Kids cooking, Kids foods, Preschool plays | Leave a commentThe girls and I had a great week. Since it is school break for Apple Cheeks, we spent most of our times doing something that we really miss to do during school days. Such as sewing, outdoor plays and most of all we miss our lovely afternoon tea where we had so much fun preparing snacks for our tea. We would chat about everything. Those were the most precious time for us.
Today, my daughter the Apple Cheeks wanted to try making cute heart shape pan cakes. It was fun and we would like to share our recipe here
-
1 cup all-purpose flour
-
2 tablespoons white sugar
- 2 teaspoons baking powder
- 1 teaspoon salt
- 1 egg, beaten
- 1 cup milk
- 2 tablespoons vegetable oil
Directions
- In a large bowl, mix flour, sugar, baking powder and salt. Make a well in the center, and pour in milk, egg and oil. Mix until smooth.
- Pour the mixture into a sauce bottle.
- Heat a lightly oiled griddle or frying pan over medium high heat. squeeze out the mixture into the heart shape cookie cutter to form the shape of heart.
- Brown on both sides and serve hot with syrup and butter.


We had a great week and wishing everyone have a very nice weekend.
LovelyDIY
Please follow me in fb for more DIY ideas at
DIY colored salt
March 22, 2014 at 5:34 am | Posted in Home deco, Homeschool, Kids activities, Uncatogorized | 2 CommentsIngredients:
Salt, food color
 Put one small drop of food color into the salt.
 Mix them well. It take a little bit of time to stir and mix until color is evenly mixed.
 My DIY colored salt in 15 minutes. Aren’t they beautiful. Mt kids are going to use it for making sand art.
cute mini animal bun
March 21, 2014 at 2:57 am | Posted in food art, Kids foods, Party foods, Uncatogorized | Leave a comment First semester school is ending today. School kids are going to have a one week short break. What a happy Friday for all the children and also for me :). This morning I woke up early to prepare these cute buns for my girl to bring to school. First time trying to shape the bread dough, I over baked some of the bun surface and you can see the doggie bun is darker. These really cheer the kids up.
Check the Recipe and Tutorial:
Recipe for bread maker machine (make about 12 small buns)
3 cups of all purpose flour
1 tbsp of yeast
1 tbsp of sugar
1/2 tsp salt
2 tbsp of vegetable oil
1 cup water
1 tbsp yogurt
 Bread dough from bread machine
 I form the dough in animal shapes. Let it sit for 30 min. Bake in the oven at 200 C for 15 to 20 minutes.

 Happy snack for the Happy Day!
Wish everyone has a Happy weekend.
Love,
LovelyDIY 🙂
Please join me in fb for more DIY ideas at https://www.facebook.com/groups/LoveLifeDIY/
Food art for St.Patrick’s day
March 15, 2014 at 12:48 am | Posted in food art, Kids foods | Leave a commentTags: food art, st. patrick's day
Happy St. Patrick's Day 2014


Green pea and mint creamy soup recipe.
1 tbsp extra virgin olive oil + extra for serving
-
¼ stick /25g butter
1 medium red onion, peeled and finely chopped
1 garlic clove, peeled and minced
5 cups/750g fresh peas, shelled (or frozen peas)
1 cup/ 75g mint leaves, roughly chopped
Sea salt and freshly ground pepper, to taste
½ cup/75g Parmesan cheese, freshly grated (optional)
Preparation:
Serves 4
Gently heat the oil and butter in a large saucepan, add the chopped onion and cook on a gentle heat for 10 minutes or until the onion is soft but not brown. Add the garlic and cook for a further 3 minutes.
Add 3/4 of the peas, the chopped mint leaves, one of water. Cover the saucepan with a tight fitting lid and cook on a medium boil for 10 minutes.
Blend the soup in a food processor, you will have a thick puree. Return the puree to the pan, season with salt and pepper and add the remaining peas, water. Cook for a further 5 minutes.
Serve with crusty, fresh bread.
If using Parmesan cheese place a small mound in the center of the bowl and pour the soup around.
Snack with panda
March 13, 2014 at 11:20 pm | Posted in food art, Kids foods, Party foods, Uncatogorized | Leave a commentHappy Friday everyone! Today is a happy day thought there is no special occasion for me today. I just feel happy to see everyone around with a happy smiling face this morning. Yeah, it is Friday! Lets have a happy snack with me.
I bought these cute bear cookie mold from e-bay. I am going to use it for making cute beary snack with bread.

Cut out the bread in cute bear shape the bear cookie mold. Eyes and mouths of the bears were filled with melted chocolate.

Snack time! Have a beary happy weekend.
Please join my facebook group for more DIY ideas at
https://www.facebook.com/groups/LoveLifeDIY/
Stone painting
February 25, 2014 at 1:44 am | Posted in Kids activities, Uncatogorized | Leave a comment
I used poster paint on the stones. Leave them dry then applied a thin layer of clear spray to protect the color from running.

Aren't they lovely?
Wish you have a LovelyDIY day.
Please join us in fb for more DIY ideas https://www.facebook.com/groups/LoveLifeDIY/
Happy Valentine’s Day
February 9, 2014 at 12:20 pm | Posted in DIY gift, food art, Uncatogorized, Valentine's day | Leave a commentMy new creation 🙂 bread and baking chocolate.

My Love to you all,
Happy Valentine's Day!
Love,
LovelyDIY
DIY 乐
DIY 3D butterflies lantern
January 25, 2014 at 1:36 pm | Posted in DIY for home, Uncatogorized | Leave a commentChinese New Year is exactly one week from now. I am glad that managed to do a simple deco for the house which I consider it as a last minute idea. Usually decorations are done in a month before the new year.

I was lucky that I found this paper lantern from a shop. The color and size are just what I was looking for. I am going to make it more colorful by adding 3D butterflies on it.

Spring is here!
3D butterfly tutorial


Sugar cookies
January 19, 2014 at 8:28 am | Posted in food art, Kids activities, Kids cooking, Kids foods, Uncatogorized | Leave a commentI had a great time baking sugar cookies today. It was fun playing with the icing piping on the cookies.


Sugar cookie recipe
230g butter, softened
110g caster sugar
275g plain flour
Preparation:15min › Cook:10min › Extra time:25min › Ready in:50min
Preheat oven to 180 degrees C.
1.Cream the butter in a large bowl or in a food mixer until soft. Add the sugar and beat until the mixture is light and fluffy.
2.Sift in the flour and then add whatever flavourings and extras you are using – then bring the mixture together to form a dough.
3. Chill the dough in the fridge for at leadt one hour.
4.Use cookie cutter to cut our the shapes then bake in the oven for 13-15 minutes or until they are a light golden brown and slightly firm on top.
5.Carefully transfer the cookies to a wire rack to cool. Lately, decorate the cookies with sugar icing.
Sugar icing recipe
1 Cup Powdered Sugar
4 tsp Milk
Directions:
Mix with fork.
Tips: To make it more of a thin glaze, add more milk. To make it a thicker icing, add more powdered sugar.
Have a Lovely DIY Day
Please join me in fb group at https://www.facebook.com/groups/LoveLifeDIY/
Food art – something to cheer the kids
January 15, 2014 at 6:56 am | Posted in food art, Uncatogorized | Leave a commentI am taking one step forward this year to explore myself into food art. Food art is a new subject to me because my projects before were mainly on sewing crafts.
Beautiful food art encourages my daughters to enjoy and appreciate the foods.


Create this for pleasure 🙂

Lovely and simple work to cheer the kids up.
Wishing you have a wonderful day!
Love,
LovelyDIY
Please join me in fb group at LoveLife DIY
Felt lollipop hair pin
January 13, 2014 at 10:08 am | Posted in Felt crafts, Uncatogorized | Leave a commentFelt crafts are so lovely. Felt material is very easy to work with because it won't fray. Today as I was tidying my craft room. I found some unique buttons which I have been keeping them for years. I decided to use it to make a pair of cute lollipop hair pin for my girls.

These beautiful buttons are my collection.
Tutorial :


Sweet lollipop for the Sweets 🙂
Wishing you have a sweet day spending with you family and friends.
Love,
LovelyDiY
DIY 乐
I would like to have you in my fb group. Find me at LoveLife DIY.
Food art (happy day)
January 12, 2014 at 4:42 am | Posted in food art, Kids foods | Leave a commentFriday is a happy day for adult and children. Apple cheeks started primary school for a week now. We are happy with our new schedule and daily routine. Besides study, we managed to spare a space for leisure and crafts activities on Friday. Yesterday we had a great time working on food art which is something new for both of us. Most of all I enjoyed the time we had together. As I read back my older posts, I just realized how much had my two girls grown. I want to spend my time wisely and grow with them.

Ingredients: normal plain rice, seaweed, chips and vegetables.

Apple cheeks showed her creativity on her first food art

Kids sandwich
January 2, 2014 at 2:48 am | Posted in Kids foods, Party foods | Leave a comment
Today is the my girl the “Apple Cheeks's” first day of primary school. Mummy decided to make her a 'star sandwich' to wish her has a good start of the year and bright future ahead.
Tutorial

For the sandwich filling : chicken, crabmeat mushroom, longbean, butter and tomato sauce.

Sealed the sandwich with sandwich sealer so that the filling won't drop out. I bought this from Daiso. But my bread is not thick enough to get the heart shape print on the bread.

Cut off the side of the bread. I toasted the excess bread, it is nice to eat with butter. No wastage.


Use a star cookie cutter to mark a star print on the bread.

Spread a thin layer of butter or mayonise of the surface of the star. Sprinkle it with tiny sugar hearts. Done!
Wishing everyone a bright start of the year 2014
Love,
LovelyDIY / LoveLife DIY
Follow us on fb group at LoveLife DIY
Penang acar recipe
December 30, 2013 at 9:14 am | Posted in Asian foods, Foods | Leave a commentPenang Acar also known as Nyonya Acar is a mixed vegetables dish that are essentially pickled by being blanched in vinegar, sugar and chilli sauce. It tastes sweet, sour and spicy. This achar is particularly delicious to be eaten the next day when all ingredients infuse together.
300g Cucumber – cut lengthwise 1½ inch
150g Cabbage – roughly cut into big pieces
50g Carrot – peeled and cut into 1½ inch

Cut vegetables
Sauce
50g Roasted Peanuts – ground
1 cup White Sesame Seeds – roasted
1 tablespoon Salt
1 tablespoon Sugar, or to taste
50ml Rice vinegar
30ml Water
1 cup grinded dried chili
2 table spoons of lemon grass (chopped fine)

1. Mix all the vegetables with 1 tbs salt. Leave aside in a colander to dry for 30 minutes.
2.Heat up the wok on medium heat. Add oil to stir-fry dried chilli paste and chopped lemon grass until aromatic. Add vinegar and water, bring to boil. Add salt and sugar to taste.

3.Turn off fire, add all vegetables, ground peanuts, sesame seeds into the wok and stir well.
4. Dish out, leave it cool then keep it in the fridge. It can last for a month.

Acar usually served as a welcome condiment to any meal and is scrumptiously devoured with haste by locals.
Have a LovelyDIY Day
Follow us on fb group at LoveLife DIY
Home deco with wooden letters.
December 14, 2013 at 8:09 am | Posted in christmas, DIY for home, Uncatogorized | Leave a commentWood letter monogram makes an elegant vintage home deco. It can easily add a personal touch to any room in your home. Great news! Now you can get wooden letters in Kaison -Paradigm Mall. This shop has almost anything you were looking for with reasonable price.


I had choosen letter 'X' and 'L'. The initial letter of my daughters's name. I decorated the letter's surface with buttons. Hot glued or UHU glued can be used to stick the buttons on the letters.

X is for X'mas! Isn't this a great Christmas home deco? Besides, this will be a great gift for birthday and wedding.
Happy Holiday
Love,
Lovely DIY & LoveLife DIY
Please join our Facebook group : LoveLife DIY
Christmas wreath with toilet roll core
December 3, 2013 at 6:46 am | Posted in Upcycled projects | Leave a comment

1. Cut the toilet roll core into 1.5 cm width.

2. Join them in a circle. Staple each ring to hold the possition.

3. Decorate with pink ribbons.
Make it more fanciful

Merry Christmas and Happy Holiday !
Food Art
November 27, 2013 at 3:09 am | Posted in food art, Uncatogorized | Leave a comment
Felt crown pin
November 8, 2013 at 10:12 am | Posted in Felt crafts, Uncatogorized | Leave a commentFelt crown hair pin is absolutely gorgeous for little girls. My daughters came across a shinny crown hair pin in an accessory shop. The price of that pin was quite costly. Mummy decided to DIY it with felt. It is as nice as the shinny crown hair pin that we saw in the shop. It only took 15 minutes to make one pin.

1. Cut out two indentical crown shape felt.

2. Hot glue the two felt crown together.


Darling, you have got yours ” pretty crown hair pin”. DIY with Love by mummy.
Soy bean and millet
November 6, 2013 at 4:53 am | Posted in Foods, Kids activities, Uncatogorized | Leave a commentTags: health food, Millet, soya bean
Soya bean and millet milk make good breakfast for my family. It is much easy to prepare with soy bean maker. It only takes 20 minutes to process. This soy bean maker is my good helper.

 Measuring cup


Select the 'wet bean process'.

My soy bean maker takes 15 minutes to go through the process. When it is done, add in pandan leaf, let it sit for 15 minutes before serve.

Have a LovelyDIY day!
DIY play dough without tatar cream
November 3, 2013 at 9:17 am | Posted in Kids activities, Uncatogorized | Leave a commentPlay dough is one of the toy that helps fine motor skill development. Now you can make your own child safe play dough (without chemical added). It is so easy to make. You can involve your children to DIY play dough. It is fun!
Ingredients
1 cup all purpose flour
1/2 cups salt
1/2 table spoon oil
1/4 cups water
Food coloring (adjust to the color that you want)

Ingredient A : In an empty bowl, mix in water, food coloring and oil.

Ingredient B: Mix flour and salt in a separate bowl.

Mix the flour and salt into the bowl (Ingredient A). Knead the dough until you can feel the right consistency ( soft but not sticky. It should be workable).


Play time!
Keep the dough in a zip lock bag or wrap it with cling wrap then put it in the fridge.
Preschooler activity- creating rongoli
November 1, 2013 at 9:42 am | Posted in Kids activities, Uncatogorized | Leave a commentDeepavali is a joyful celebration. Many of its symbols – candles and lights, rangoli, flowers and fireworks. These make ideal subjects for exploration with your children through crafts and story. Besides that, celebrating diverse festivals is a wonderful way to introduce children to different cultures and customs.
You can find awesome craft ideas online and story about Deepavali here.
My daughter (six years old, homeschooling) was working on a mini rongoli


DIY Dragon Fruit Sorbet
October 26, 2013 at 3:05 am | Posted in Foods, Uncatogorized | Leave a commentTags: Dragonfruit


Dragon fruit is a beautiful fruit. The plant is actually a type of cactus, and the fruit comes in 3 colors: 2 have pink skin, but with different colored flesh (one white, the other red), while another type is yellow with white flesh. Dragon fruit tastes sweet, with a flavor between kiwi and pear.
Dragon Fruit benefits:
1. Dragon Fruit is low in cholesterol content and has no unhealthy cholesterol fats that harm the human body.
2. The fibers in the fruit help to get better bowel movements. It is also a good solution for constipation.
3. Dragon fruit is a natural source of antioxidants.
4. Dragon Fruit is advantageous for cardiovascular health and also helps to decrease the irritation of joint.
I usually make Dragon Fruit Juice or ice-cream for my kids. Today I am trying on a new recipe- Dragon Fruit sorbet. My good friend passed this lovely and easy recipe to me which my family absolutely love it.
Dragon Fruit Sorbet preparation
Ingredients:
- 1 ripe magenta-fleshed dragon fruit
- 1/4 cup cold water (optional -if fruit is not ripe)
- 1 tablespoons lemon juice
- 1 tablespoons sugar (optional)
Preparation:

- Place dragon fruit in a blender. Add water (if fruit isn’t juicy), lemon juice and sugar. Sometimes the fruit is sweet enough not need additional sugar. blend until smooth.
- Pour smooth puree into a shallow freezing glass bowl and freeze it. It takes about 2 hours to freeze. Allow about 10 minutes at room temperature for the sorbet to soften before serving. This process and recipe works with most fruits.

Lovely magenta Dragon Fruit sorbert.
Have a Sweet Sorbet day with Lovely DIY
Wolf berry leaves soup
October 24, 2013 at 4:13 am | Posted in Asian foods, food, Uncatogorized | Leave a comment


These are Wolfberry leaves. Wolfberry plant is a small, slender, native shrub that grows to be 3-7 feet tall.
To prepare wolfberry soup

Chicken bones and carrot were used as soup base. Boil for about 45 minutes. Then add in wolfberries and its leaves. Boil for another 5 minutes or until the leaves are soft.

This is my family super soup. My children love the sweetish flavour of the soup. You can break an egg in the soup just before serving.
Have a Lovely DIY day.
DIY basic felt bow
October 23, 2013 at 2:54 am | Posted in Felt crafts, Uncatogorized | Leave a comment


 Attach hair pin at the back of the bow.

 Lovely felt hair pin.
Have a LovelyDIY day!
Upcycled man shirt- little pouch
October 22, 2013 at 3:38 am | Posted in Uncatogorized, Upcycled projects | Leave a comment


2. Unbutton all the buttons.


Close all buttons after sewing as step 3. Now, you can make two or three pouches (depand on the sizes you cut). All you have to do is to devide the pouch size as shown in the photo (red cutting lines). Then sew up the two sides.

Completed!

Use it for keeping small objects such as hair pins and snall toys.
Halloween candy cover
October 21, 2013 at 2:09 am | Posted in Felt crafts, Halloween, Uncatogorized | Leave a commentMaterial: felts, needle and thread, scissors a nd hot glue

I bought this set of 5 pcs felt from Daiso

Cut the felt into the shapes as shown in the photo.

To make the felt pumpkin, attach the two yellow felt with the purple stem. Stich half of the pumpkin up.

Attach the eyes and mounth with hot glue. (Do not contact the hot glue with your fingers. Keep the hot glue out of reach of children).


Halloween treat candy covers.
Have fun Halloween!
The 15 DIY toys with cardboard.
October 20, 2013 at 4:05 am | Posted in Uncatogorized, Upcycled projects | 2 CommentsThis is a totally awesome DIY toys idea that I wanted to share with you. Check it out http://www.apartmenttherapy.com/diy-toys-you-can-make-with-cardboard-196193

Fine and gross motor training for kids
October 18, 2013 at 11:02 am | Posted in Kids activities | Leave a commentWhat is motor skills?
Motor skills are motions carried out when the brain, nervous system, and muscles work together.
Fine motor skills are small movements that use fingers, wrist, lips and tongue. For example picking up tiny object with fingers and writting.
Gross motor skilks are the bigger movements that use the large muscles in the legs, arms, torso and feet. For example: running, jumping and dancing.
Gross motor development is important part of your child's development. You can help your child develop these skills by providing activities that encourage fine or gross motor movement.
Activity: transfering beans from bowl to bowl.
My two and a half years old daughter is carrying out the activity : transfering beans. A simple and fun motor training that you can carry out at home with your kids.

1. Preparation as shown in the photo above.

She loves this activity. She was transfering beans from bowl to bowl. It also helps to train her concerntration.
Have a fun LovelyDIY day with your kids.
Creamy pumpkin soup
October 16, 2013 at 12:34 pm | Posted in Asian foods, Foods, Uncatogorized | Leave a commentThe Creamy pumkin soup is a family favourite. It is easy to prepare and it is perfect with a scoop of sour cream. Try this velvet smooth pumpkin soup recipe. It is easy to prepare and full of nutritious. Hope you will like it.

Ingredients
750 pumpkin, diced
2 medium onions, diced
3 chicken stock cubes, crumbled
3½ cups water
250 mL thickened cream
Salt
Pepper
Method


Owl candies treat bags
October 14, 2013 at 3:12 am | Posted in Halloween, Kids activities, Uncatogorized, Upcycled projects | 1 Comment

Upcycled containers
October 12, 2013 at 7:58 am | Posted in Kids activities, Uncatogorized, Upcycled projects | Leave a commentIt is a lovely Sunday morning. Today is the day that I scheduled to reorganize my daughter's room. As I was clearing out the old junks, I found a few empty facial cream containers. It can be upcycled to something awesome! I decorated it with nail polish. This is a very simple and lovely weekend project and also a fun activity for kids.

Jelly orange
October 12, 2013 at 7:58 am | Posted in Holiday foods, Kids activities, Kids foods, Uncatogorized | Leave a commentMaking edible craft is fun for kids. My darling girl ‘AppleCheeks’ was all excited when she found this lovely idea -jelly orange from Pinterest. Pinterest has been one of her favourite reference site for crafts. She couldn’t wait making the lovely orange jelly. At least she is making use of the internet wisely :).
Let’s make jelly orange now:-

1. Cut oranges into half. Clean and empty the skin as shown.

2. Cook the jelly strips until it completely melt.

3. Blend the pandan leaf for flavouring.

4. Add in pandan juice and sugar into the melted jelly.


Cocktail sausage octopus
October 11, 2013 at 7:14 am | Posted in Halloween, Kids activities, Kids cooking, Uncatogorized | Leave a comment

Good day everyone. It is october now where beautiful fall begins. Our lovely Octopies are here to celebrate the month of October with everyone. LovelyDIY is excited to prepare for the little Halloween party for the kids though it will only happen on the last week of this month. Children are excitedly preparing for their Halloween costumes, treat bags and games..
To make the Octopies: It is pretty simple. You need to have cocktail sausages. Boil it until cooked. Cut cross to form tentacles. Finally, use toothpicks to poke holes for the eyes.
Wish you have a beautiful Fall.
Love,
LovelyDIY
Join us in facebook. Find the page Lovelydiy.
Thank you for following.
Sock doll
October 9, 2013 at 9:11 am | Posted in Socks, Uncatogorized, Upcycled projects | 2 CommentsTags: art and craft
This is my very first DIY soft toy made of old socks. I made this for my little girl who would like to have a soft doll. My two years old lil sweet pea started to carry out pretend play at home. Every morning, she places her soft toys in a row sitting on the floor. Then she fed each of them with her toy cutlery set. It is so wonderful to watch her played and acted like mummy.
Here is my own sock doll idea. It is pretty easy.
Tutorial:

You need to have one sock, two pieces of felt cut and sew as shown in the photo above. You also need poly fiber or cotton which to be used to stuff the toy ( sorry, I missed out the stuffing material in this photo).

Prepare two bundle of yarns as shown in the photo above.

Stuff the poly fiber inside the sock and sew up 'A' and 'B' lines as shown above. I stitched up the legs with the longer piece of 'felt B'.

I cut out two tiny circles and a pink half moon with felt. Then hot glued it to make the eyes and mouth.

For the hair- use the bundle of yarn 'A' . Place the shorter side as the doll's fringe. Hot glue to secure the position.

Now, use bundle of yarn 'B', place across yarn 'A'.

My very first lovelyDIY doll is born!


My darling girls and the new members in the family. We love you!
Wish you have a lovelyDIY day.
DIY 乐
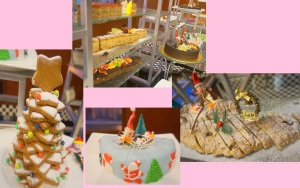
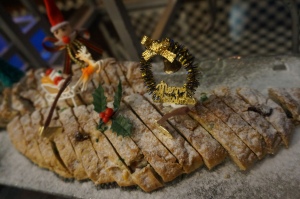
WIP’s 24 Carat Christmas, Bangsar Shopping Centre
December 27, 2014 at 1:06 am | Posted in christmas, Food reviews, Foods, Uncatogorized | Leave a commentWIP’s 24 Carat Christmas
Review by Choy Kwok Ming & Erica Sam

I’m always on the lookout for a great place to chill after a hectic day. Most days, your choices are limited to either good food with bad ambience OR good ambience with lousy food. This Christmas, the wife and I were feted to all of the above, and more. On Christmas eve, we were invited to WIP for great food, fantastic music and a very relaxed place to chill out. Exploding with a 24 Carat Christmas theme, WIP rolled out the red carpet for us.

WIP at Bangsar Shopping Centre has always been known as a great place to go for a drink. The regulars are a mixed crowd of expats and Bangsar locals, who expect great ambience and an equally well stocked bar. It’s the place where the beautiful go to be seen, and where everybody knows your name. I loved how the staff treated us with utmost professionalism, yet were able to maintain a buddy, buddy feel.

As part of the SOULed OUT group of restaurants, it’s also famous for its innovative marketing ideas and energetic crew. Tonight’s presentation was no different. Featuring a live band that had many a patron dancing by their table side, and a crew of 24 carat golden fairies that went around greeting the guests, it was no surprise that WIP is THE place to go.


WIP, however, is usually off my food radar. I had a misconception that a great bar could not contain a great chef. WIP proofed me wrong that night! Promoting a Christmas dinner choice of Baked Crusted Seabass, Karuma Prawn or Provencal Crusted Beef, the wife chose the seabass while I had the beef. We were both astonished by the quality of the cooking. The seabass was both moist and firm. Sweet to the core, the seabass was large enough to share. Perhaps a touch of tangy sauce would have created a delicate contrast to the fish.

The beef, however, ruled the roost. Consisting of an Angus tenderloin, my steak is, in my opinion, the best steak I’ve had in a long time. Cooked medium, the beef had a nice mineral taste and was so very soft to bite. It was almost like cutting butter with a hot knife. Although not as well marbled as a Kobe steak, WIP’s chef managed to cook it beautifully. Even my wife loved it, and she usually shies away from beef. Kudos to the chef.

In addition to the main courses, WIP had also laid out a buffet of starters, the traditional carvings of turkey and roasted lamb and a small selection of Christmas desserts. I generally appreciated the buffet, but felt the main course was more than sufficient. The portions both pleased the palate and satisfied the belly.


WIP ended our meal with a selection of Christmas cocktails, specially created for this Christmas package. We sampled their Fire & Ice and the Gold Rush. While both were delicious, it was the Fire & Ice that stood out. A tasty concoction of Gin, peach puree and lime juice, this cocktail had an exotic lacing of fire. Rimmed with a touch of chili, it gave my nostrils a flare of fire that was immediately quenched by cool lime juice. What a wonderful creation! My hat’s off to the barkeep.
In summary, WIP is a complete package: great entertainment, food and drink all in one place. As a bonus, you get a fantastic presentation of professionalism yet friendly crew, who try their utmost best to make your night an enjoyable one. If you read this early, try to book their New Years’s Eve dinner. WIP promised us an equally fantastic meal awaits, to be topped off by a blazing display of fireworks, celebrating both New Year’s Eve and BSC’s 50th anniversary.
Checker’s Cafe, Dorsett Regency KL
December 23, 2014 at 5:19 am | Posted in Uncatogorized | Leave a comment12 Dishes of Christmas Compilation
Review by KM Choy & Erica Sam
Christmas is all about giving. At Dorsett Regency’s Checker’s Cafe, it was all about giving your tummy a great feast. Presenting their “12 Dishes of Christmas Compilation”, my wife and I were invited to preview a Christmas dinner with all the bells and whistles. As we settled down in our seats, our waitor asked us if he could serve our welcome drink. It seems we were to start off our meal with a pleasurable peppermint hot chocolate. The brainchild of Dorsett’s Marketing Manager, it featured a homemade peppermint stick dipped in a mug of rich, hot chocolate. Yummy!

Dorsett’s cafe is an all-day dining, mid sized restaurant that seats about 25 tables. Although not very large, Checker’s Cafe’s buffet variety match many of the other larger establishments I’ve visited. The normal offerings were there: manned stations for Japanese sushi, local noodles, soups, breads and cheeses, desserts, various seafood and oysters. For the “12 Dishes of Christmas Compilation”, Checker’s Cafe came out with a special 12 Christmas main course to supplement it’s usual buffet choices.

We started of with the Compress Risotto with Bravo Chicken. My wife loved the risotto. She found the rice to be well cooked, to a nice creamy consistency. While agreeing with her, I would have added a slightly stronger tasting cheese to give that extra oomph.

Next, we were served the California Mussel Bouillabaisse. Bouillabaisse was originally created as a stew or soup by Marseille fishermen. At Dorsett, the chef used California mussels in lieu of fish. Paired with a soup consisting of onions, tomatoes and various herbs, the bouillabaisse was a nice contrast to the mild risotto.

The third dish was an Oxtail Stew served in Malay Style. While technically not an authentic Christmas dish, the oxtail stew served to us was delicious. It was not too sweet, as is usually the case with Malay stews.
The fourth dish served to us was a Tender Beef with Holland Onion & Blue Cheese Dressing. Having never tasted a blue cheese dressing, I was expecting a strong smelling dish. Surprise, surprise, the beef was tender, as promissed, and the dressing was delicious.
My wife and I agreed that the next dish was one of the best dishes of the night. Imagine a piece of smooth, sweet, firm fish fillet, lathered in a rich, creamy, nage sauce. We definately savoured every bite of the Poached Butter Fish with Roasted Nage Sauce

Next on the list was an Oyster Omelette. I had expected the oyster omelette to be something simillar to Penang’s Ochien. While the dish had the nice flavour of oyster permeating it, I felt the omelette itself was a bit of a let down. It was not enhanced in any other way except by the insertion of the oyster.
After the oyster omelette, we were served Braised Beancurd with Pumpkin. It was a trully golden dish, with the golden pumpkin sauce cupping the yellow beancurd. Best eaten with rice and oxtail stew, the mild beancurd had a very Chinese influence.
As opposed to the beancurd, I could eat this dish all day on its own. The Braised Sea Cucumber with Mushroom was an exquisite dish. Paired with mushrooms, the sea cucumber was soft and so full of flavour.

The next two dishes represent a very meaty Christmasy tradition. Grilled Lamb Shoulder with Black Pepper Sauce and Roast Turkey With Cranberry Sauce are two must have dishes in every Christmas dinner, in my opinion. Inexperienced cooks tend to overcook turkey, and dry out the meat. Dorsett did not disappoint, with a lamb shoulder and roast turkey that was perfectly cooked, and juicy at every bite.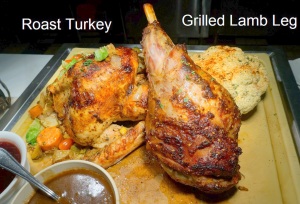
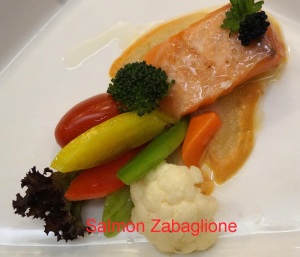
After the huge chunks of turkey and lamb, we were given some Sous Vide Salmon Zabaglione to try. Sous vide salmon is a method of cooking salmon sealed in airtight plastic bags, in a water bath. The purpose is to cook the salmon evenly, without overcooking the exterior. I’m a great fan of salmon, and love it both as a shashimi or as a grilled steak. I have not tasted this method of cooking salmon and found it a bit mild to my taste.
The Grilled Foie Gras with Wild Citrus Consomme was the last of the 12 main course dishes. The creamy, buttery foie gras was heaven to bite into. It literally melted in the mouth and gave a delicious aftertaste.
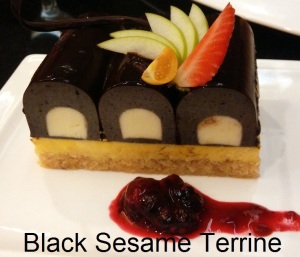
After all the food, we had to sample the desserts. Looking even more attractive than the main courses, it would appeal to the child in you. The product of Dorsett’s Pastry Chef, Chef Mohd Sabri Norizan, Checker’s Cafe typically displays between 25 and 30 different desserts per buffet.
A 1st prize winner of the California Bread Competition, he has whipped up about 40 different desserts for this Christmas special. Among my favorites at this sampling was the X’mas Pudding with Vanilla Spice Sauce, Milk and Raspberry Bavaroise with Earl Gray Panacotta, Black Sesame Terrine With Passion Fruit Cheese Cake and Green Tea Tiramisu With Cherry Cake
Chef Mohd Sabri’s desserts are not your typical sugar bombs. They are lovely mouthfuls of flavour that doesn’t make you cringe with a sugar high. It’s like having a “kurang gula” dessert, yet maintaining a delicious I-want-more feeling. The icing on the cake (pun intended) is that his desserts are actually much healthier than many other offerings out there. Chef Mohd Sabri uses Treasure Drop Natural Sugar replacement, which he claims to contain only 20% of the calories found in an equivalent amount of sugar. Now, that’s having your cake and eating it too!

For those who want to enjoy a quiet , cozy Christmas dinner with your loved one, head down to Checker’s Cafe at Dorsett regency. The Traditional Christmas Eve & Day Buffet Dinner is going for RM98.00++ (Per Person) / RM190.00++ (Per Couple)
Christmas food art
December 18, 2014 at 8:13 am | Posted in food art, Holiday foods, Kids foods | Leave a comment

My daughters love strawberry. This morning the two cheeky pies requested to get a small box of strawberry when we were in the market. I used a few of it to make a christmas breakfast plate for them. It was so lovely.
Wishing everyone has a wonderful Holiday!
Maleficent food art
October 30, 2014 at 11:22 pm | Posted in food, food art, Uncatogorized | 4 Comments
Trick or treat with Maleficent. It was made of rice, seaweed to make the eyes, hair and clothes. Baked pumpkin with cashew nuts. Bye October, Hello November

Create a free website or blog at WordPress.com.
Entries and comments feeds.
